Friday, January 27, 2012

Getting Organized

I'm always trying to get organized, and every once in a while I stumble upon some great "things" to help me! 

1.  My recent favorite find is these red and white stackable bins found at the dollar tree.  No joke, I have bought about 50 of these to organize my craft room, preschool room, and office. 
2.  I'm too cheap to buy tons of those large plastic storage bins for everything, so I came up with this.  Reusable grocery sacks hung on hangers.  I have filled them with yarn, play food, random bottles, jars, etc.  

3.  And last is my way to organize all the crayons, markers, scissors, etc.  I bought these filing shelves at a thrift store and the little baskets at Walmart for really cheap!

Boys and Their Cars

As does any house of boys, we have a lot of cars, car tracks, etc. running around here.  I saw this cute idea on pintrest and it was a hit at our house! Sorry I couldn't find out who the original source was, but THANKS to whoever came up with this idea!  We connected our masking tape road to some of our existing car tracks.  I also incorporated a fun idea for a sight words parking lot, to help S work on his sight words for preschool, found at Juggling With Kids.

Thursday, January 12, 2012

Ten Color Activities

1.  Color Caterpillar:  My inspiration for this came from here.  It's really simple, cut out the color shapes.  Glue them in the shape of a "C".  Draw a face.  Have child pick a name that begins with a "C".  This could be used in a colors unit and in teaching letter "C".

2.  Color Slapping Game:  I bought these color posters from the Dollar Tree and put them up in our preschool room.  I give my boys each a plastic spatula and then say things like, "S, can you find the color green."  "L can you find the color purple." "What color is the pumpking?  What color is the rubber duck?"  And they slap the correct poster.  I learned this in my teacher education program.  We've also tried it with spelling words, sight words, shape posters, etc.  It's a big hit at our house!

3.  Color Junk Sort:  Found the idea here along with many other CUTE ideas.  The one with the number is for S.  He has to put the correct number of colored objects into each section.  For L, I did no numbers, he just has to sort them into colors.  I found these boxes on sale at Michaels Crafts for $1 each!  I taped construction paper into each space and found all the "junk" around the house.
4.  Color Nature Hunt:  I can't seem to find the link where I found this activity, but I'm pretty sure it was on the blog Tired Need Sleep.  She has great ideas!  This activity is best done in spring or summer.  We went on a hunt outside to find something in nature for each color.  Then we dumped out our bags and shared our treasures.


5.  "The Color Song"  found at Mrs. Jone's Room.  We LOVE this song at our house!  Here's just one verse to give you a taste: 
(To the tune of "If You're Happy and You Know It")

If you are wearing red, shake your head
If you are wearing red
Then please shake your head
If you are wearing red, shake your head

6.  "I Have...Who Has..." Game:  Another great find from PreKinders!  Click on the link for directions and downloads.  This game works on colors and shapes.  S keeps asking to play this game, he caught right on and loved it!  L had a harder time getting it, but it was a really good way to see what shape and color names he knows.  It starts to cost a lot when printing in color, but there are always deals on copies too!  (Frugal Tip:  Office Depot had a coupon a few months ago for $10 off a purchase of $10 or more.  So I made a folder of all the preschoolish things I wanted to print in color and printed them there for free! Their website or the fabulesslyfrugal website will show deals like these.) 

7.  "Oh Rats" Game by Discover Toys:  We had this game when I was little, so my sister and I were ecstatic when we found it at a thrift store for $2.00!  I always check the games isle everytime I go to the thrift store, you never know what treasures you'll find!  I looked on ebay and saw a few copies of the game. We also play color games just using the color spinner from "Oh Rats".  If you can't get a hold of the game, make a spinner or dice with colors and try these variations:
a.  "I See":  Spin or roll the dice.  Look around the room for something of that color.  I say to everyone, "Something that is purple is the package of baby wipes." 
b.  Colored Laundry:  We tried this one yesterday.  I was working on folding laundry and the boys wanted me to play with them.  I dumped all the clean laundry on the couch then spun the spinner.  It landed on green and I said, "S will you please bring me all the laundry with green on it?"  Then I would fold it and go until we did all the colors. 
What other spinner or dice games do you play?
8.  Fruit Loop Necklaces:  A classic and EASY activity that I seem to forget about.  So incase you have forgotten too, I'm am posting about it.  I had L tell me the name of the color as he put it on.  I had S make color patterns on his necklace.  Tip:  Tape one end of the yarn or string with masking tape for easier stringing. Tie a froot loop double knotted on the other end to keep them on the string.

9.  I saw this idea here  and decided to also make it a color activity.  S and L loved dropping the water and shaking the tray to make the colors dance.  They also learned that if you collide the colors, they make new colors.  (See how I got my pipets and another pipet activity here.)

10.  Coloring Snow:  I think this was the favorite color activity at our house!  I filled each muffin tin hole with snow, filled glasses with primary colored water (using food coloring) and gave the boys pipets.  They mixed colors and colored their snow.  I ended up giving them plastic spoons also for stiring and tasting (they thought it tasted SO good!) and straws for drinking the melted snow. 


Wednesday, January 4, 2012

Cricut Creations

My sweet hubby surprised me and spoiled me for Christmas with a...CRICUT!  Needless to say my crafty heart has come alive again and I've been making some signs.  My hubby cut some two-by-fours for me into the appropriate lengths.  (Frugal Tip:  I love using 2x4's because they are so cheap!  It was $2 for 8 ft!) Then we had a girls' night and made these to honor those brave military men in my family. 
Step 1:  Cut the wood.
Step 2:  Sand the wood.
Step 3:  Paint the wood.
Step 4:  Use sandpaper to stress the edges of painted wood.
Step 5:  Cut letters using scrapbook paper and Cricut.
Step 6:  Modge Podge letters and whole blog to seal it.  (Also could use vinyl letters)
 I also made this fun sign for my mantel.  As I was sitting down to make it, S and L wanted to paint with me.  So my mother-in-law found some scrap wood and I just let them paint.  S insisted on turning his into a sign with letters.  He came up with the phrase completely on his own...so that dinosaurs can see it and know that they are not allowed in his room!  It was an easy way to craft my own thing while the boys did their own thing.


Get in on After-Christmas Clearance

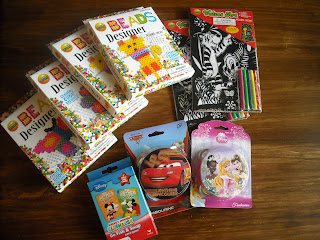
I LOVE after holiday and end-of-season clearances!  Rite Aid is one of my favorite places to go, because who thinks of going to Rite Aid for those kind of things?  Not as many people as go to Walmart!  In their stocking stuffer section I found these $1 items marked at 50% off.  I will put them in my gifting box for when my kids need to give a little gift or when I need to provide a litle prize to my kids.  S was so excited about the bead creations, that he used some of his own money to buy one from me when we got home.  I'll be heading back next week to see what lager items I can find in the 75% off clearance that can go in the gifting box.
 These bigger items also will go in my gifting box for neice and nephew gifts and were purchased for $3.50 each.  If you don't have a gifting box...you should start one!
 I also went to Michael's craft store and bought this giant roll of Christmas coloring poster for $1.99.  I'll either use it for my preschool next year or for my kiddos next year.  Michael's has great clearance deals, but watch for incorrectly labeled deals, they do a very poor job at letting you know how much something really costs! 
Where do you go for great clearance deals?

At the Table: Pipets, juicing, marshmallow shapes, and rice

It's always handy to have something the kiddos can do while I'm cleaning the kitchen or cooking.  These are a few activities we like:

1.  Juicing:  The boys always want to squeeze limes with a lime squeezer...not my favorite activity to supervise.  So I cut up some green sponges and let the boys fill them with water and squeeze their own "limes" into a pitcher.  Lime squeezers can be found almost anywhere...Walmart, Targets, etc.  I also give them measuring cups and bottles to practice pouring with.  We call this a pouring job (from the Montessori method).  Go into it knowing you're going to be cleaning up water and changing clothes...and it ends happy!
 2.  Color Mixing with Pipets:  Use food coloring, water, and a plastic cup or baby food jar to make each of the primary colors. Let kids explore mixing colors into empty cups. Also could try this idea by mixing colors in snow!  I've seen this idea in plenty of places on blogs, but I was too cheap to go out and buy pipets for $3 each from the hobby store.  So my frugal heart showed me a way around it.  I found some Infant Triamenic on clearance for $1.79 at ShopKo.  Then I combined that with my $3.00 off 2 Triamenic coupons.  I bought 9 things of Triamenic for $.29 a piece.  I will use the medicine too, but what I really wanted was the pipets!  Yes, I LOVE couponing!    (See other pipet activities here).
 3.   Marshmallow Shapes: discovered this by accident when we were making gingerbread houses.  S came up with his own idea by creating things with marshmallows, toothpicks, and graham crackers.  Provide the materials and let them explore!
4.  Rice and Popcorn Kernels:  Put a tray underneath to catch some spills.  Mix rice and popcorn kernels and have kids sift through a colander.  They also like to scoop with an ice cream scoop and practice transfering from one bowl to another (another Montessori job). 

Saturday, December 10, 2011

Flannel Board and Felties

I finally got around to making a flannel board.  It was super easy.  I used a recycled sheet of that foamie project board we had laying around.  Then I covered it in flannel (used 50% off coupon at JoAnn's) and hot glued it to the board. 
My boys had recently got these cute Pixar cutouts that I knew would be destroyed in a day.  So I covered them in clear contact paper (found cheapest at Walmart on the isle with shelfing paper).  The last step was to make them into a feltie by covering the back with glue stick and rubbing dryer lint on the glue.  This fabulous dryer lint idea was found on "Bust Out Your Crayons" .  Then S & L used these Pixar felties to tell their own stories using the Pixar characters.

 I made some Nativity story felties by cutting out pictures from "The Friend" magazine from the Church of Jesus Christ of Latter Day Saints.  A copy can be found here.

These are some felties for songs.  "Five Little Monkeys", "Old MacDonald" and "Five Little Speckled Frogs".  I had my boys help color these while I worked on the laminating part, they can also be found on "Bust Out Your Crayons", along with many other song and story feltie printables.  Make sure to read the directions on the sidebar about printing.